Windchest Part 2:
Laying Pouches
The next big step was to lay all the leather pouches on the pouch boards. If you have been following this blog, you may remember that I didn't get any photos of re-leathering the water-damaged pouches in my existing chest. I have made up for it now with plenty of pictures (and a video, if I can get it to upload). I started by cutting the long pouch boards into three sections so they would be easier to handle. Next, I sanded the edges of the pouch well so they are gently rounded over. If this edge were left sharp, the pouch would rub against the sharp edge each time it plays and could lead to premature failure. I also inserted the 1/4" dowel for aligning the pouch board to the toe board.
The steps for laying the pouches were exactly the same here as they were a couple years ago when I was repairing the existing chest, but I will go through it again anyway. Plus, now I have photos to share.
1) Cut a 3/8" dowel about 6 inches long. This will fit through the spring hole and be used to center the pouch over the well.
2) Apply a thin layer of fish glue around the pouch well. Do not use so much that it oozes out onto the pouch board or especially into the well. Fish glue is used because it holds well, but can be cleanly removed if necessary for future repairs (hopefully not for 50 years!). It also cleans up easily with water.

3) Put the dowel through the spring hole and hold it several inches above the glue. Place the pouch atop the dowel with the felt washer centering the pouch on the dowel.
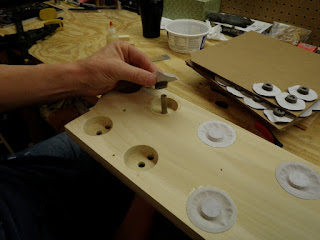
4) Lower the dowel and pouch until the pouch sits level with the pouch board. Gently press the pouch to the glue. Wait a moment for the glue to set and gently press down on the pallet until the felt washer rests on the bottom of the well.

5) Smooth out any wrinkles in the pouch and press the edge of the pouch firmly to the pouch board.

6) After 24 hours, use the dowel to raise the pouch as high as it will go without stretching it. Make sure the pallet will rise high enough to seat against the toe board. Very gently run your finger around the edge of the well. Feel for stiff places where glue may have oozed out onto the leather. Use your finger to break up the glue without stretching the pouch. Sharp bits of glue can wear a hole in the leather causing early failure.

7) Carefully untangle the springs. Stretch the tail out at one end just a bit so it will hold in the board. Gently place the spring through its hole. Make sure the spring seats inside the felt washer.

8) Use the fish glue to attach a paper disc that holds the spring in place and seals the pouch well closed.

After all the pouches were laid, I attached little spacer blocks 5mm thick next to each mounting screw. These ensure that the pouch board is always precisely the correct distance from the toe board. I then mounted the pouch boards to the toe board. Since I hadn't yet attached the side boards, I was able to clearly see the valves making contact with the toe boards. Out of 122 pouches, there was only one that didn't quite seat perfectly. I remedied this by gently massaging the leather to stretch it ever so slightly. I put the pouch board back in and it was fine. This photo shows the pouch board mounted to the toe board, but before I attached the sides.

No comments:
Post a Comment